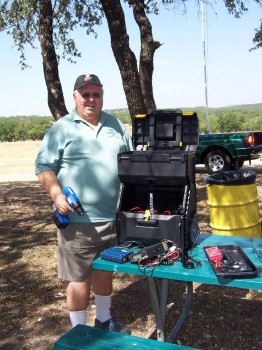
 Here’s a photo taken of me on Sunday, July 12th, about 3 hours before my van held an impromptu BBQ Cook-off in the middle of the road.
Little did I know what was about to happen, but I sure looked satisfied at the time of this photo, at least with the progress I was making with my emergency go-kit in a rolling tool box.
By the way, the story posted earlier about W21IK and his antenna test at Bullis County Park? This photo was taken by W2IK during that event, because he said it wasn’t fair that I got to take all the photos and hide behind the camera. 🙂
I started out with a plain heavy duty Stanley brand toolbox w/ wheels available from Wal-mart for about $20.
This toolbox was selected because the wheels were mounted on a single piece steel rod shaft that ran the full width, from wheel to wheel. In other words, the wheels weren’t simply snapped onto the sides like some of the other cheaper models I had looked at elsewhere. Also, I had looked at some two-piece toolboxes that stacked, but they ran the risk of having the two pieces come apart at the wrong time while loading or unloading from your vehicle, or rolling to where ever you needed the kit to be. I just liked the idea of a one-piece double stacked toolbox with strong wheels that were unlikely to come off at the wrong time.
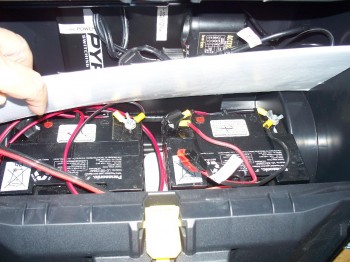 I installed the two 28-amp hour sealed lead acid batteries inside the bottom compartment.
The toobox now weighs in at about 25 pounds so far with the 2 batteries, the converter and the 12 vdc power supply.
I also used some extra styrofoam from a shipping container for padding around the batteries to keep them from sliding around when the toolbox is tipped to be rolled around.
Both batteries are connected with a special wiring harness that has a built in charging circuit allow the batteries to automatically charge if the 12 volt DC power supply is running, or for the batteries to supply the power for the radios and AC converter if no AC power available.
This circuit prevents power feedback trying to short out the batteries or the 12 vdc power supply.
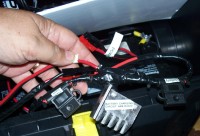 I used 12 gauge stranded power wire for the harness and all connecting power jumper cables. I borrowed a heat sink from a dead PC power supply, but it didn’t really need to be that big, it was just free and conveniento use.
I fused each side of link, the one leading to the 12 vdc PS and the other leading to the battery, to make double sure if something shorted out, it would blow the appropriate fuse first.
Circuit design by Bob K5AUW – I’ll scan and post that to my web site later on with a parts list and instructions on how to build one.
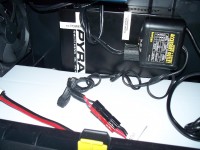 I mounted a Pyramid 30amp power supply vertically behind the batteries, using double face tape to hold it in place against the inside rear wall of the toolbox.
A while back, I had found this Pyramid 30 amp Power Supply at Amazon.com for under $70 with free shipping. Amazing! Light weight, very thin (about 4″ or less) and fit in my box just fine.
I cut that piece of corrogated plastic to put on top of batteries, side to side, to provide a safer, cleaner looking workspace, and reduce the chance of something shorting out the battery posts.
I tried to use a label maker to properly label everything to show what cables were what, and where the various on/off switches might be.
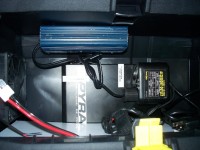 I also installed a used 300 watt DC to AC converter, mounted it upside down inside the battery compartment to provide AC power when needed. I’ve owned that converter for many years, used it off and on, mostly off.
I tried to mostly re-utilze previously “on-hand” parts and supplies for this project to keep my cash costs down.
Last year, I had been given a used 2-meter 50 watt mobile radio in exchange for helping to sell the other radios from an estate sale.
When I first starting thinking about doing this project, I had bought the two used sealed lead acid batteries from a local ham, Bob K5AUW, who used to work for a hospital that had to recycle their batteries used for life support quality equipment based on age (12 months?). (Note: Bob often posts these batteries for cheap when he has them available on this website’s Free Classifed Ads, so check them out if you need some.) And I had been carrying the converter for use in my van to support the need for testing computers, running electric tools, charging my HT radios in the field, etc.
Since the converter used a cigarette power plug, I decided to install one of those types socket instead cutting off the wires on the converter to connect direct, which would perhaps be more efficient. But this way, I can still remove the converter and reuse it externally if needed, just by taking out 4 screws. (See above photo)
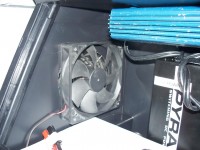 I installed an extra large 120mm PC Chassis Fan to help cool / vent the battery compartment if needed. Will be installing an illuminated “on/off rocker switch next to the fan, facing outward, so I can reach over and click to turn on the fan without opening the compartment. (Switch not shown is Radio Shack part #276-0013).
I put a standard metal fan grill on the outside to protect from tiny fingers, and am thinking seriously about putting one on the inside also just for safety purposes. I happened to have the metal fan grill on hand as a spare with the fan, left over from a PC upgrade project a couple of years back.
Not shown – I’m still thinking about installing a house electrical outlet box like you would put outdoors on a front porch or back patio, with the weatherproof flip lid, over on the right hand side of the toolbox (as you face it). If I do that, I’ll be re-using some parts from a dead UPS to provide the outlet mounted in the box, with a fused overload / reset button, and the AC cord from that same UPS to plug in the DC-AC converter outlet and connect the bare wire end to the outlet and fused surge button.
I recommend never lifting the toolbox using the provided handle grip on the top, because only the hinges of the lid are connecting that handle to the rest of the toolbox, and I’m not a trusting fellow when it comes to weight. I added a snap connector on the front lid where a lock could fit, just as a safety measure.
I used all Anderson Power Pole connectors to make up the harness and connect everything except the cigarette lighter power plug and the 120vac power cable for the Pyramid power supply. I borrowed the crimper from another ham, Al KE6LGE, after finding out that the “real” crimper really does work better than the “make do” cheaper crimpers.
Haven’t yet decided whether to actually mount the radio inside the top box and put a coax connector thru the wall of the box so that I could just screw in the coax to the outside of the box to connect the radio to an antenna, or whether to leave it loose and just pull it out when I want to operate and sit it on a table next to the box. Might be more comfortable doing it that way, and just keep the top compartment availble for storing the radio, extra coax, etc.
This low priority project is obviously very much still under construction, so check back later to see what kind of progress has been made. I do have the advantage of seeing other hams with similar go-kits already built, to learn from their experiences about what to do or not to do while building my own.

July 22nd, 2009 at 3:28 AM
[…] regular readers will remember a posting we made earlier about an Emergency Go-Kit Idea that involved some minor surgery to a Stanley Toolbox with wheels, by adding a couple of sealed […]
February 1st, 2011 at 5:54 PM
Obviously a car battery cannot supply the huge amount power normally available via the mains, but 200 watts can do some serious work. Well, You’re having such a good idea.